Configure Encryption (Cloud)
In addition to the transport-level encryption that is always in effect between your cluster and Pepperdata, and the secure https access that the Pepperdata dashboard requires, you can enable 128-bit AES-CBC (symmetric) storage-level encryption for sensitive data at rest, such as user names, hostnames, and job and queue names.
When this extra level of encryption is enabled, Pepperdata receives and stores only the encrypted version.
To configure encryption for your cluster, add the PD_ENCRYPTION_KEY and PD_ANONYMIZE variables to your Pepperdata configuration file, /etc/pepperdata/pepperdata-config.sh.
Notes and Limitations
-
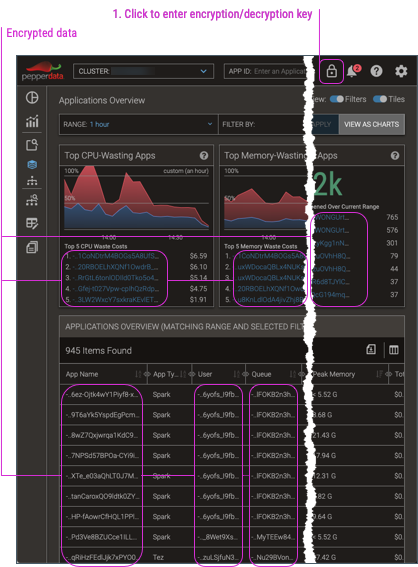
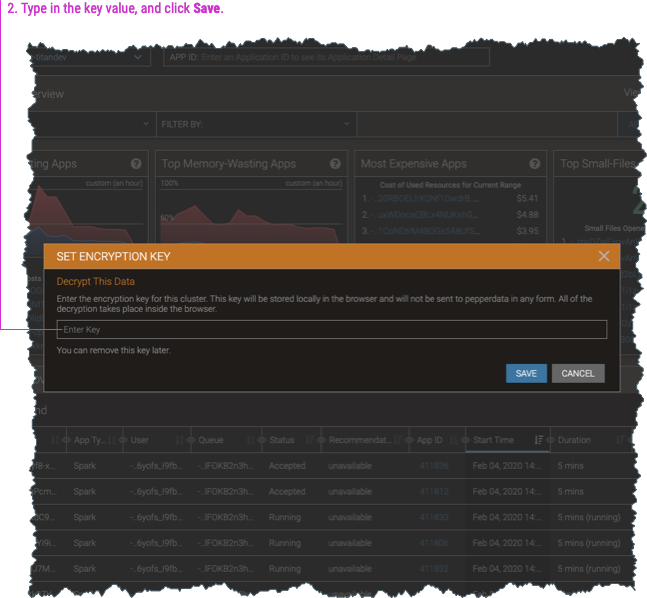
When you enable encryption, the dashboard by default shows the data in its encrypted form. To view the decrypted data, you must enter the encryption key (which is also used to decrypt the data) into any dashboard page.


-
Impala data cannot be encrypted.
-
Although you can perform full-text searches for application names even with encryption, partial matches are unsupported. For example, if the application name is “hive”, searching for “hive” yields the expected result. But when encryption is applied to perform the search, the encrypted value for a partial search string will not match any portion of the encrypted value of the full string. Therefore “hiv” cannot be matched if the full name of the application is “hive”.
-
If you use the Pepperdata REST API to access data from encrypted clusters, you’ll need to decrypt the returned data strings; see Decrypt Data Returned for Encrypted Clusters.
Procedure
-
Generate an encryption key, which is also used to decrypt the data for your Pepperdata dashboard display.
-
You can use a commercial or open source tool to create a randomly-generated key; for example, the OpenSSL command,
openssl rand -hex 16. -
You can manually create any arbitrary string to use as your key; for example,
MyCustomEncryptionKey. -
Be sure to keep your key secret and secure in accordance with your organization’s security policies.
-
-
In your cloud environment (such as GDP or AWS), configure Pepperdata for encryption.
-
From the environment’s cluster configuration folder (in the cloud), download the Pepperdata configuration file,
/etc/pepperdata/pepperdata-config.sh, to a location where you can edit it. -
Open the file for editing, and add the following variables. Be sure to replace the
my-encrypt-decrypt-keyplaceholder with your actual encryption key.export PD_ENCRYPTION_KEY=my-encrypt-decrypt-key export PD_ANONYMIZE=1 -
Save your changes and close the file.
-
Upload the revised file to overwrite the original
pepperdata-config.shfile.
If there are no already-running hosts with Pepperdata, you are done with this procedure. Do not perform the remaining steps. -
-
Open a command shell (terminal session) and log in to any already-running host as a user with
sudoprivileges.Important: You can begin with any host on which Pepperdata is running, but be sure to repeat the login (this step), copying the bootstrap file (next step), and loading the revised Pepperdata configuration (the following step) on every already-running host. -
From the command line, copy the Pepperdata bootstrap script that you extracted from the Pepperdata package from its local location to any location; in this procedure’s steps, we’ve copied it to
/tmp.-
For Amazon EMR clusters:
aws s3 cp s3://<pd-bootstrap-script-from-install-packages> /tmp/bootstrap -
For Google Dataproc clusters:
sudo gsutil cp gs://<pd-bootstrap-script-from-install-packages> /tmp/bootstrap
-
-
Load the revised configuration by running the Pepperdata bootstrap script.
-
For EMR clusters:
-
You can use the --long-options form of the
--bucket,--upload-realm, and--is-runningarguments as shown or their -short-option equivalents,-b,-u, and-r. -
The
--is-running(-r) option is required for bootstrapping an already-running host prior to Supervisor version 7.0.13. -
Optionally, you can specify a proxy server for the AWS Command Line Interface (CLI) and Pepperdata-enabled cluster hosts.
Include the
--proxy-addressargument when running the Pepperdata bootstrap script, specifying its value as a fully-qualified host address that useshttpsprotocol. -
If you’re using a non-default EMR API endpoint (by using the
--endpoint-urlargument), include the--emr-api-endpointargument when running the Pepperdata bootstrap script. Its value must be a fully-qualified host address. (It can usehttporhttpsprotocol.) -
If you are using a script from an earlier Supervisor version that has the
--clusteror-carguments instead of the--upload-realmor-uarguments (which were introduced in Supervisor v6.5), respectively, you can continue using the script and its old arguments. They are backward compatible. -
(Supervisor v7.0.6 and later) Optionally, you can override the default exponential backoff and jitter retry logic for the
describe-clustercommand that the Pepperdata bootstrapping uses to retrieve the cluster’s metadata.Specify either or both of the following options in the bootstrap’s Optional arguments. Be sure to substitute your values for the
<my-retries>and<my-timeout>placeholders that are shown in the command.-
max-retry-attempts—(default=10) Maximum number of retry attempts to make after the initialdescribe-clustercall. -
max-timeout—(default=60) Maximum number of seconds to wait before the next retry call todescribe-cluster. The actual wait time for a given retry is assigned as a random number, 1–calculated timeout (inclusive), which introduces the desired jitter.
-
-
# For Supervisor versions before 7.0.13: sudo bash /tmp/bootstrap --bucket <bucket-name> --upload-realm <realm-name> --is-running [--proxy-address <proxy-url:proxy-port>] [--emr-api-endpoint <endpoint-url:endpoint-port>] [--max-retry-attempts <my-retries>] [--max-timeout <my-timeout>] # For Supervisor versions 7.0.13 and later: sudo bash /tmp/bootstrap --bucket <bucket-name> --upload-realm <realm-name> [--proxy-address <proxy-url:proxy-port>] [--emr-api-endpoint <endpoint-url:endpoint-port>] [--max-retry-attempts <my-retries>] [--max-timeout <my-timeout>]-
For Dataproc clusters:
sudo bash /tmp/bootstrap <bucket-name> <realm-name>
The script finishes with a
Pepperdata installation succeededmessage. -
-
Repeat steps 3–5 on every already-running host in your cluster.
